Introduction
Another day, another installment. Today we will be analyzing the Jaws of Gallet battleplan through the lens of an Ogor Mawtribes army. Again we'll make a Course of Action (COA) sketch as a possible gameplan to execute depending on the composition and disposition of the enemy. This Ogor list focuses almost exclusively of Gutbuster Infantry supported by two foot-casters that also deliver excellent abilities. Complementing this force is a Frostlord on Stonehorn (FLoSH) that will be playing the role of the exploitation force, quickly delivering a great deal of combat power and an additional threat of rapid movement with the Stonehorn's rampage.
The core concept here most closely resembles a movement to contact that transitions into an envelopment. This approach plays well into the more straightforward nature of the army. What happens, though, when the battleplan's twist can make your strategy play directly into your opponent's favor? Let's take a look at the Jaws of Gallet battleplan with the new information we have in order to create dilemmas for our opponent while we develop decision points, key events in time and space on the battlefield, so we can maintain the iniatiative.
Background
The Jaws of Gallet is a five objective battleplan. The twist is that from the second battle round at the end of their turn, the underdog can remove one objective (OBJ) from play. If there is no underdog, no OBJ is removed. You score 2 for holding an OBJ, 2 for controlling 2 OBJs, 2 if you control more OBJs than your opponent, and 4 if you achieve your chosen BT. A couple of takeaways here: Whoever goes first in the battleround starting with the second AND is also the underdog has the opportunity to score an OBJ then delete it. They also have the opportunity to remove an OBJ that you control before you can score it. The latter is the more common technique, where players might intentionally go down on points in order to shape the battlefield how they want it. This is especially effective with highly defensive armies.
This COA sketch attempts to account for this by allowing to both react to how your opponent scores so you can remove the OBJs you want, or to be in a position to continue to apply pressure with your forces if they are the underdog and pull OBJs out from under you. Also remember there is a change in how you check for control of OBJs in this edition. You check at the start of the first battle round and at the end of each turn. Don't reveal any information you don't need to. If you deploy on two OBJs, your opponent immediately has a path to become the underdog on points and begin setting conditions in their favor. If you do not who will go first turn, avoid this mistake.
I am inclined to believe that if it is apparent my opponent is going to intentionally go down on points, I will do everything I can to make them regret that decision. Because I do not know which OBJ they will remove, I need to maneuver in such a way that I can score battle tactics while maintaining security and bringing combat power to bear. We can also potentially throw a spanner in our opponents plans by flipping the script in putting them in a position where it may be disadvantageous to remain down on points. One technique we can use in that scenario is to only capture two OBJs or even intentionally drop a battle tactic. This is what makes the battleplan interesting and I would love to hear your thoughts.
Deployment
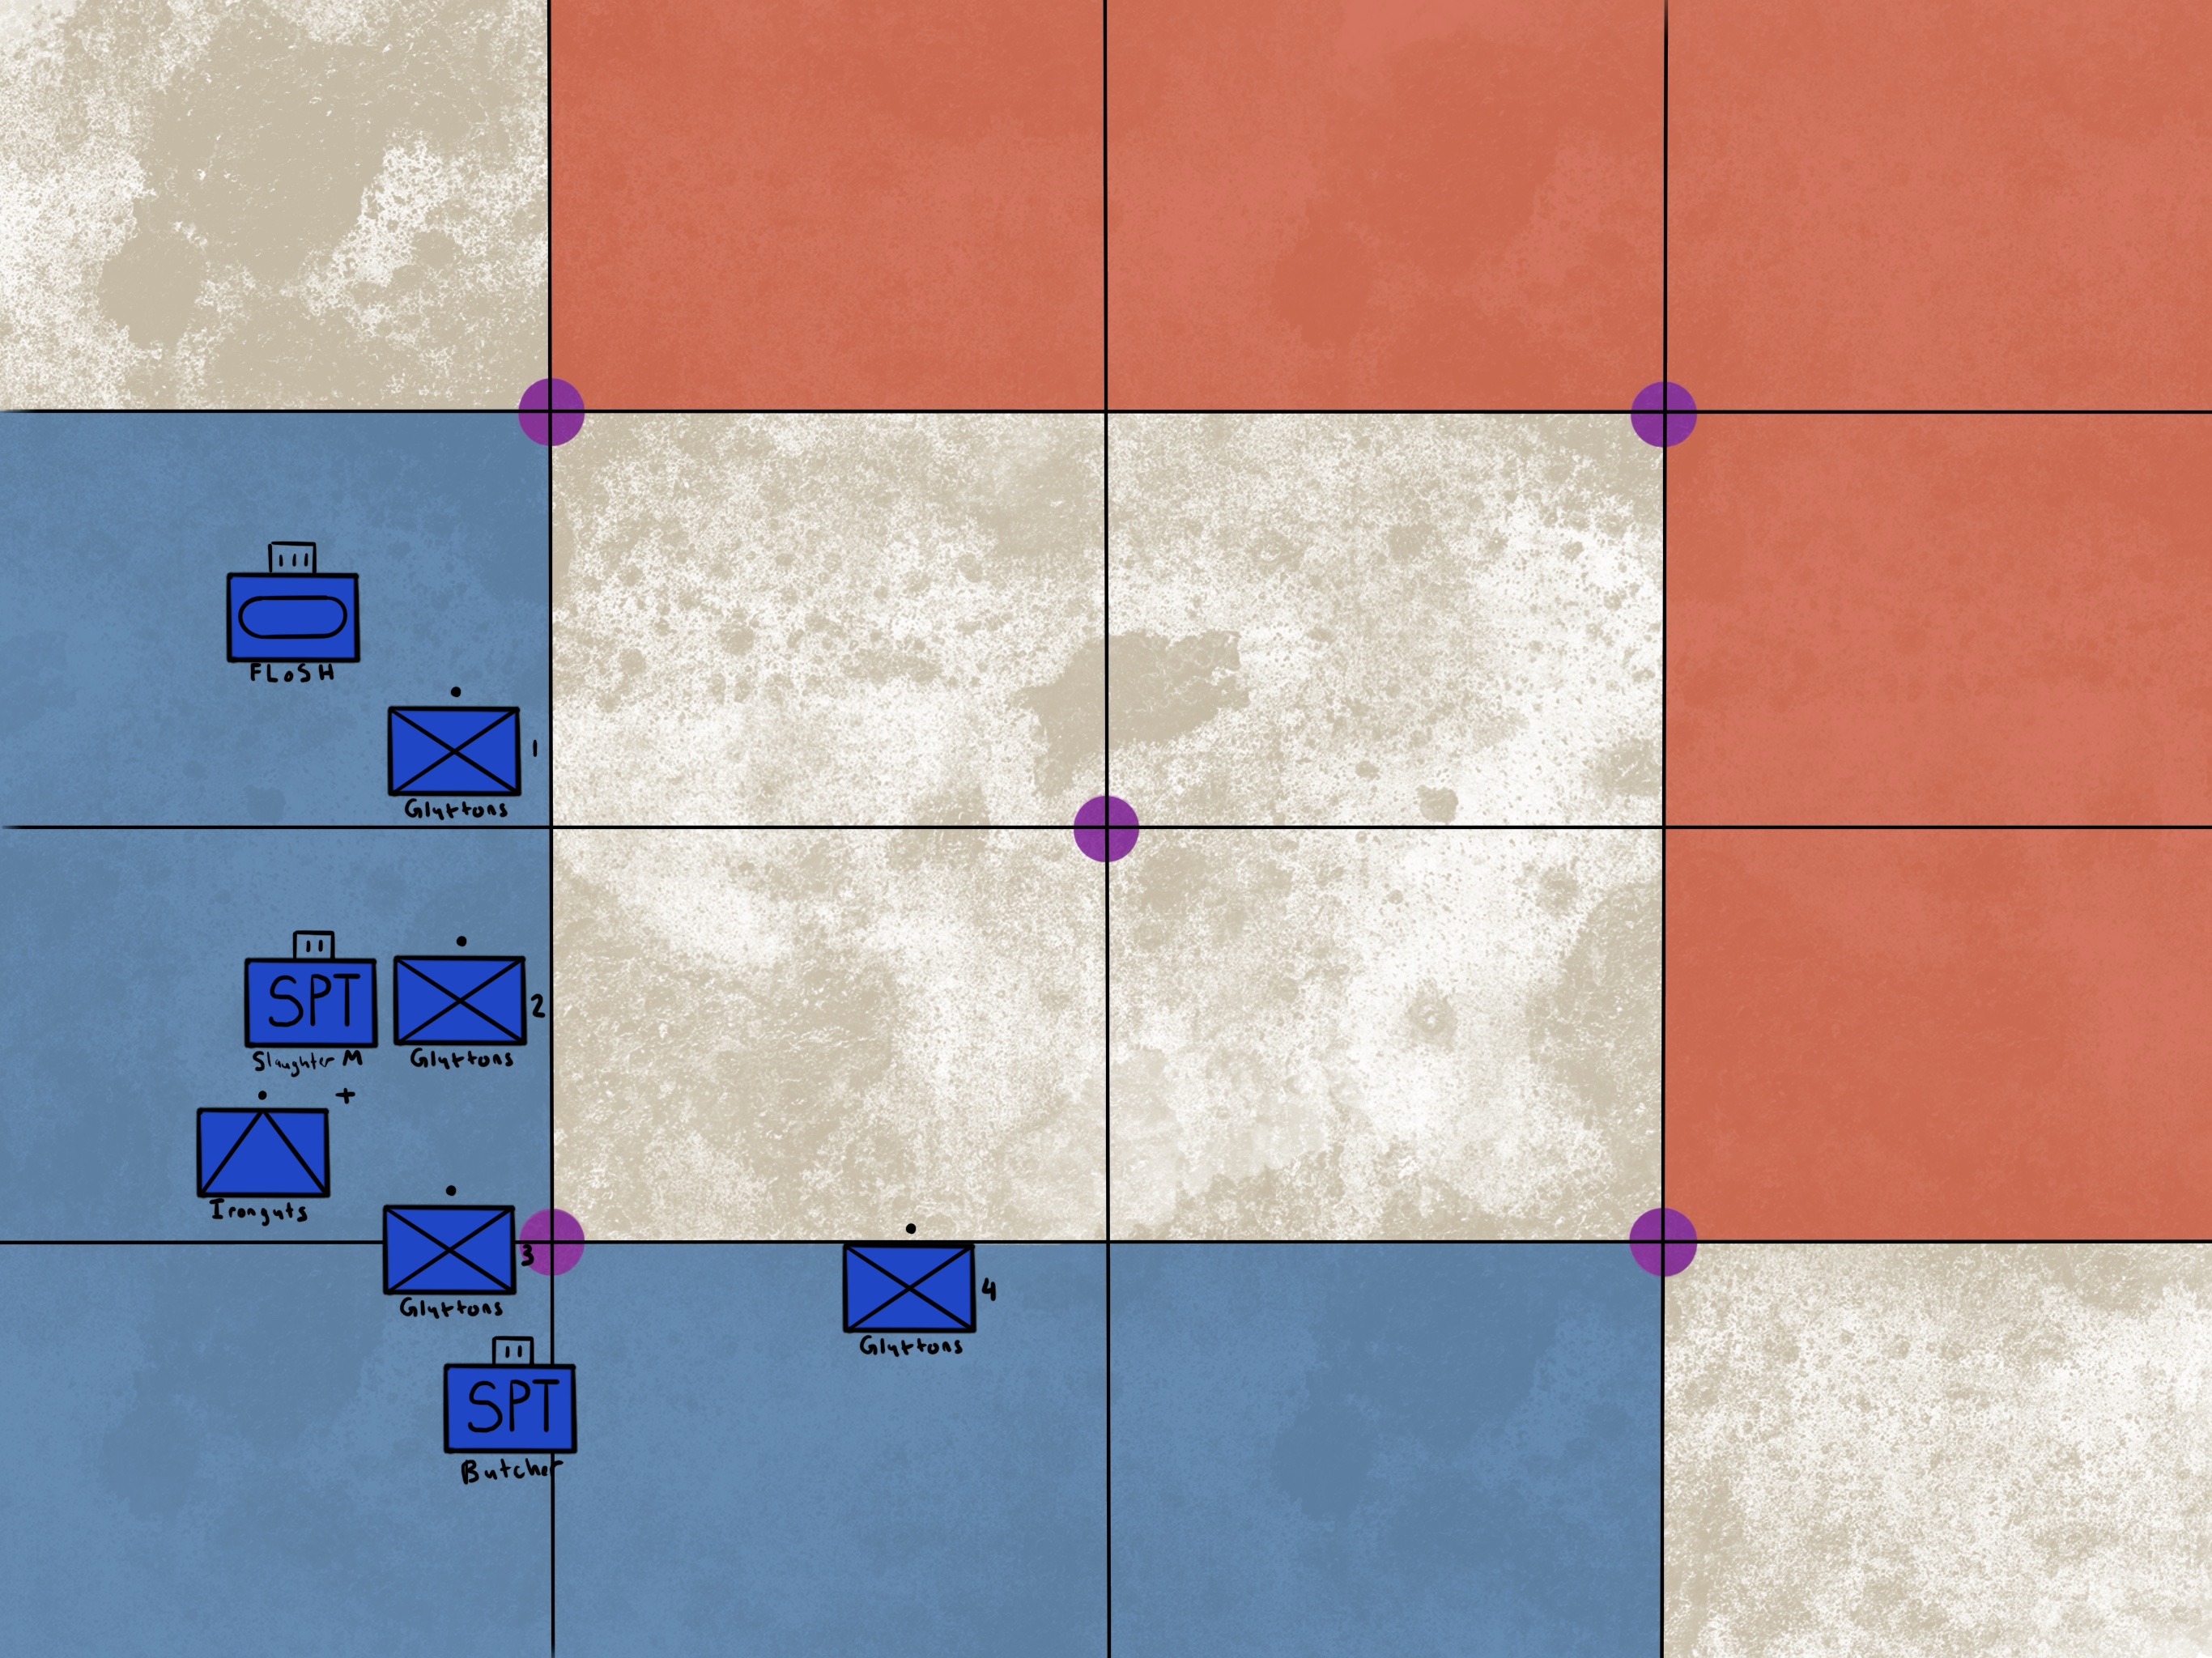
The majority of our forces consist of Gluttons. This is because they are cost-effective and can perform independently relatively well. We have also chosen to run minimum strength units in order to get as many chances at damaging the opponent's units with the Trampling Charge ability. Additionally, this gives us added flexibility to achieve battle tactics. We deploy off of the "home" OBJ because we do not want to give our opponent any information that allows them to remove objectives. It also gives us the opportunity to select exactly how many objectives we want to score should our opponent deploy on an objective or if they go first in the first battle round.
We have arrayed our forces to sufficiently screen and maintain security with three units, Gluttons 1, 2, and 4. The FLoSH, reinforced Ironguts, and Gluttons 3 will serve as the exploitation forces after the initial point the enemy makes contact with our first line of troops. Examining the geometry of the map in conjunction with our capabilities, we want to keep our foot heroes (Butcher and Slaughtermaster) close enough to our combat power to use their abilities. Overlapping multiple units at one time to keep options open as the enemy produces casualties and attempts to outmaneuver us is essential.
What we are setting up here is a situation where we create a dilemma for the opponent. We will advance along the long axis of the board, capturing primary OBJs and completing battle tactics to create a deficit. If the enemy attempts to remove OBJs and commit to the defense, we have multiple, diversified threats to commit to the counterattack.
Turn 1
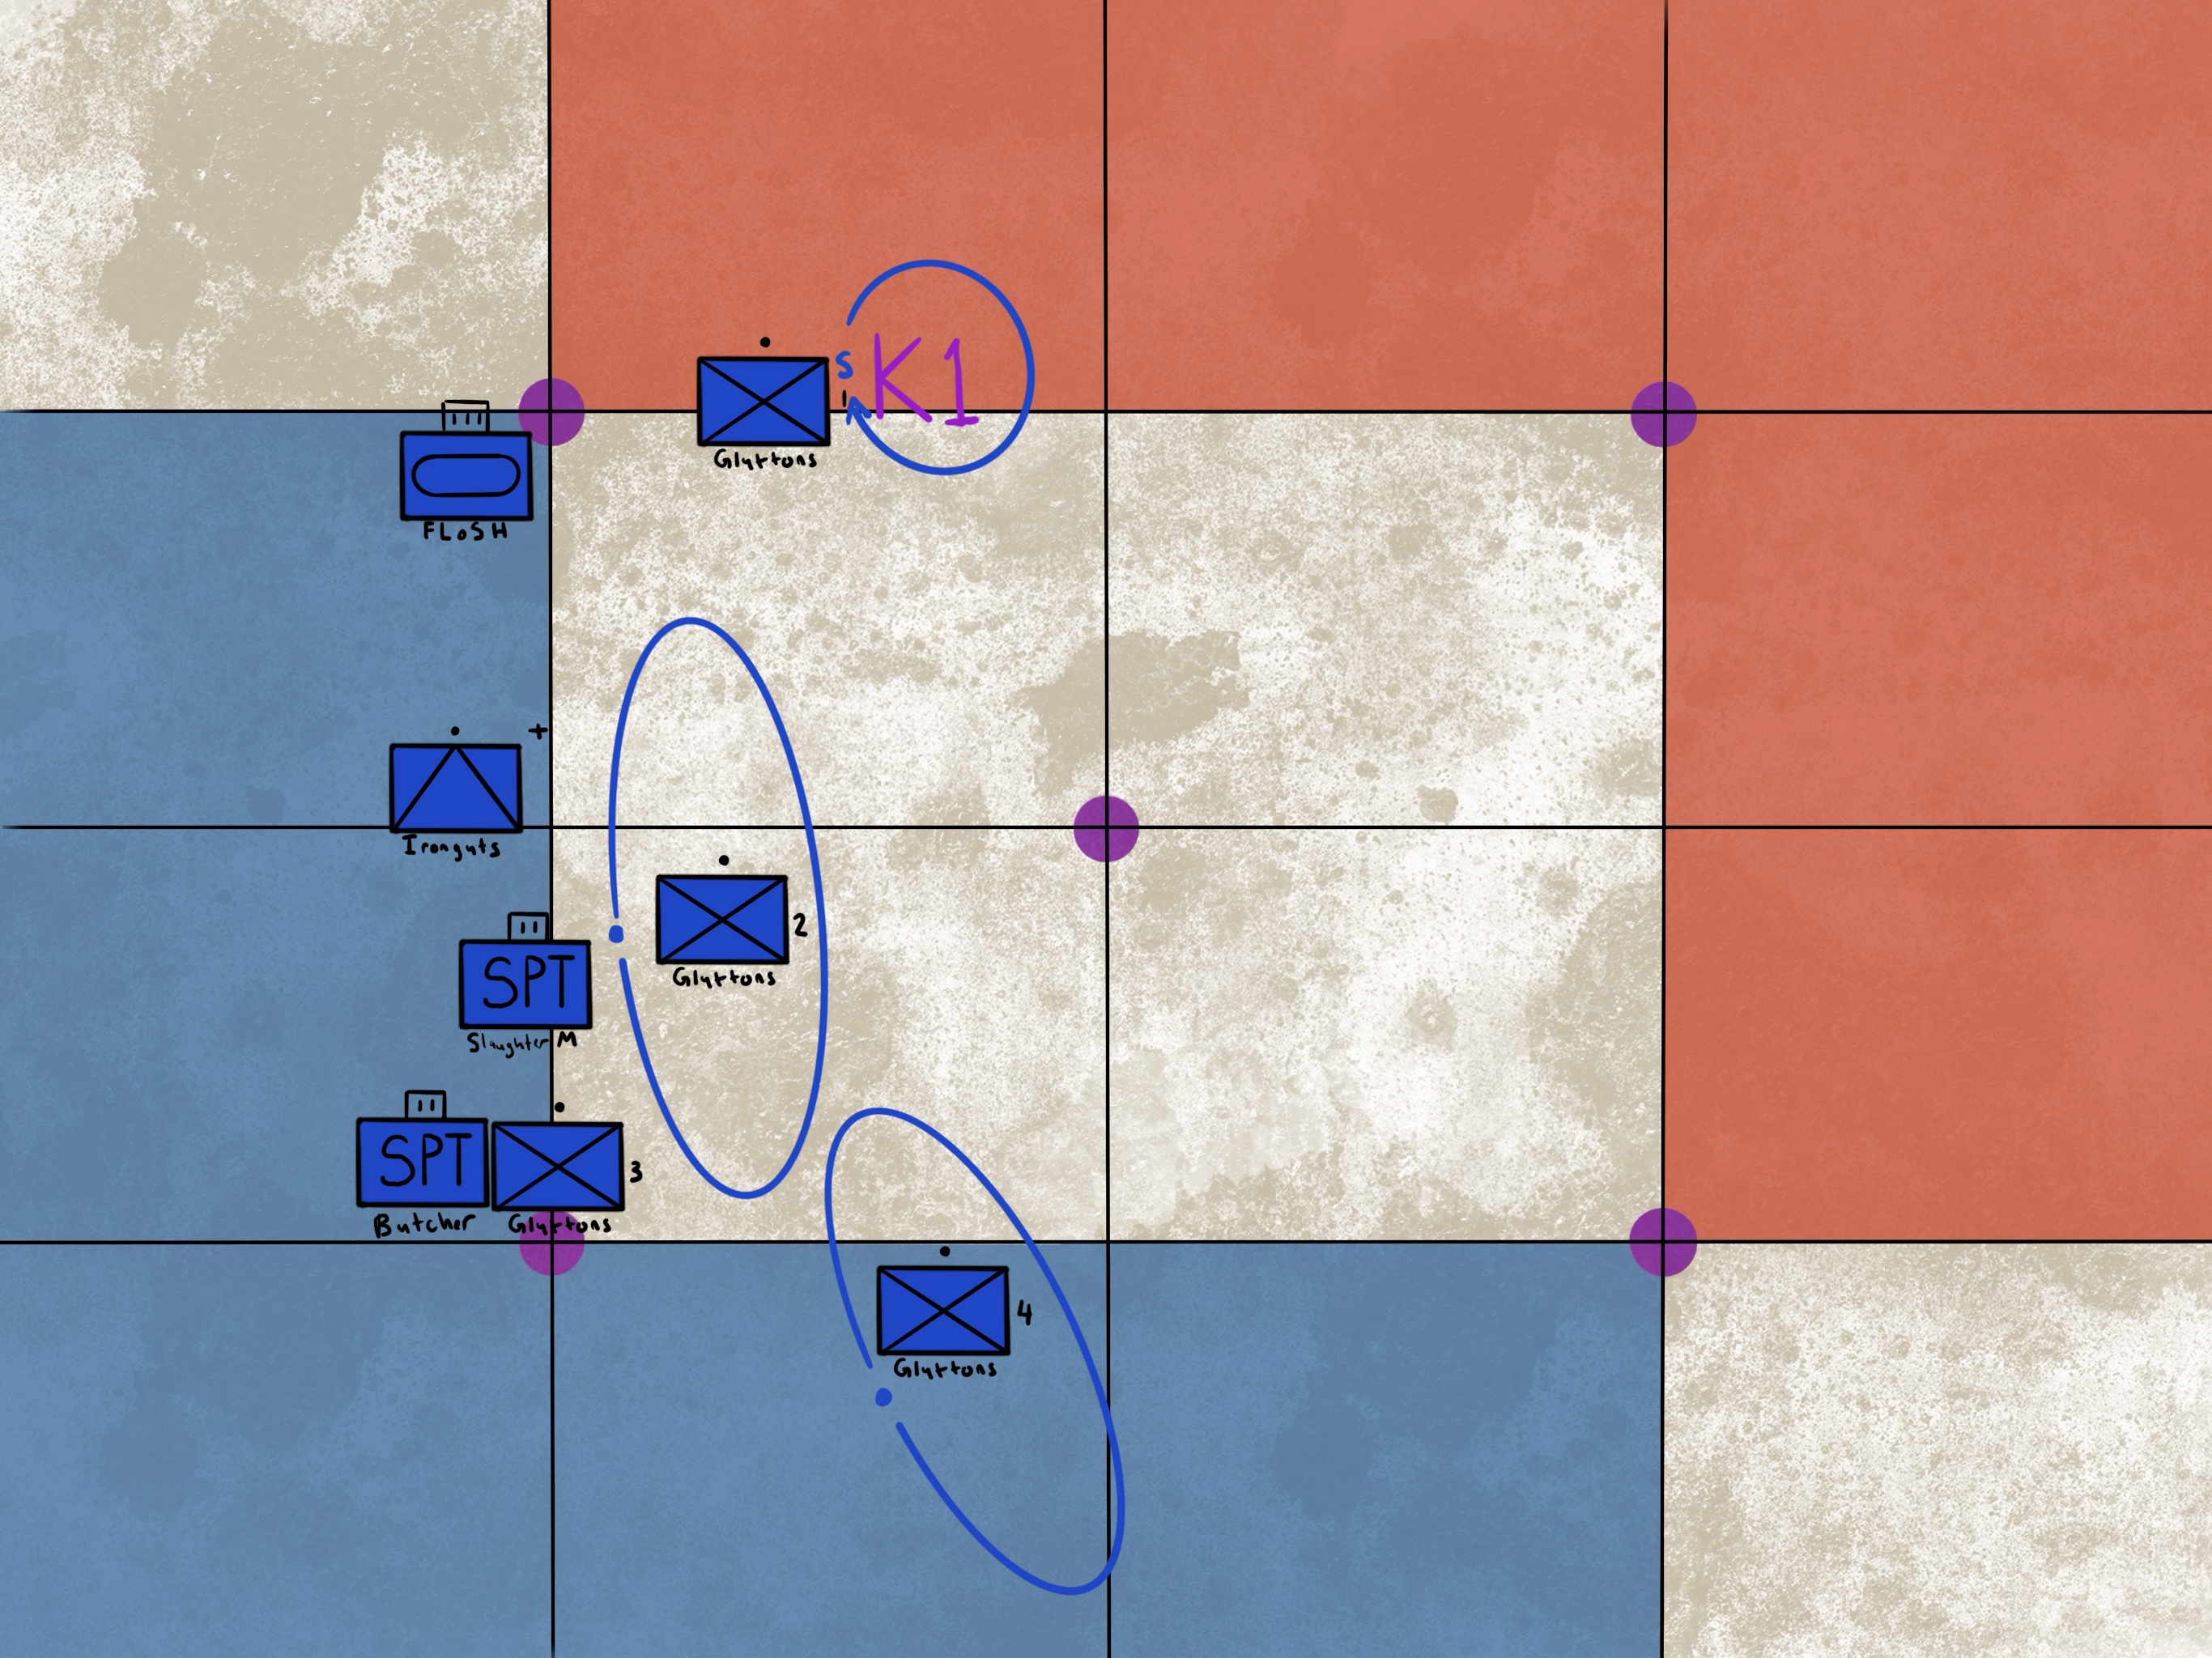
Our first phase of this approach is establishing security as well as assembly areas for our exploitation forces. We know that our opponent cannot remove an objective this turn so we can safely bank on scoring the two western points (if they want to commit any forces that far from the rest of their army, We are only going to commit to these two OBJs no matter who goes first. It creates the dilemma for our opponent whether they want to go up on points or to be the underdog to shape the battlefield. We are arrayed in such a way that we can adjust for either.
Gluttons 1 also has the tactical task of securing Key Terrain 1 in the north as a possible early battle tactic, Take Their Lands (based on the suggested terrain layout provided in the battlepack). Again, put this into context of how many points your opponent has scored if they went first. We want to remain far enough away from our opponent's maximum effective range (movement and charge) to disincentive them from committing a force that is not favorable for us to deal with. This means our forward line of troops could be closer to our territory or further away depending on the enemy's mobility. Even if they do commit to long charges, the likelihood of them successfully executing multiple (around 9"+) charges is slim. If they commit only a unit or two at a time, we have effectively disrupted their tempo. This advance also allows the Gluttons to be mutually supportive. If one unit gets charged, others on the flanks or from the rear echelon are in a position to attempt a countercharge (so long as you left space for them).
Turn 2
At this point in the engagement, if the opponent is the underdog, they have the choice to remove a battle tactic. In order to do so without us having the opportunity to score it, this means that they have to go first in the battle round. This is why we have set up in a more cagey, deliberate fashion. They can take the first turn in the round as the underdog and remove the tactic, but our standoff distance and security posture we took makes such a decision costly. If we go first in the battle round, we have the opportunity to establish a hasty defense on the center objective and commit our first echelon of troops to the fight or to continue to deny the enemy freedom of maneuver across the board.
More importantly, we are setting up for our decisive operation, the commitment of our exploitation forces. The Gluttons independently are a threat to the enemy and if we have destroyed any units, our Slaughtermaster can be handing out valuable offensive and defensive buffs. This is the point we are expecting the most likely contact with the enemy. Depending on the positioning of our Mawpot, we are also able to use the once-per-game heal to any units that have taken casualties. If the enemy commits a high value target or you see a gap in your opponent's defenses, your Butcher is now in a position to grant a run and charge ability to your Ironguts and in subsequent turns, have the option to head northwest to accomplish the Take the Flanks battle tactic should the need arise. We are also in a position that we are likely able to make charges and commit the entirety of our force should we choose to do so.
This is the operation's decision point. How and when we decide to commit our exploitation force will make or break us. Ogors are not a very resilient army compared to some of its peers. It has a high quantity of health but low save characteristics. Some Ogor units can survive a turn or two into some enemies, but most hammers will not have much of an issue destroying a unit of Gluttons. Knowing this, we have to pick a single, decisive point to apply as much of our combat power as we can in an engagement. Massing effects with our mortal wounds output, relatively high damage output, and abilities to produce as many casualties as possible and defeat the enemy.
Turn 3+
Here is where our offensive will likely begin to culminate as we conduct a single envelopment with our remaining forces and begin to secure the rest of the battlefield. Depending on how the enemy has engaged our forces, we can expect at least 30-50% of our forces to be destroyed. In this phase, we reconsolidate our gains by remaining close enough to any remaining objectives so we can capture whatever the opponent has not removed.
By this time we will have committed the exploitation forces and ideally will have destroyed the enemy's capability and will to continue the fight. Because the margin of victory might be quite narrow even if we destroy the majority of the opponent's forces, we need to ensure we are able to continue scoring battle tactics. Here we can see that the Seize the Center, the Kunnin' Approach, or perhaps even Slay the Entourage could be achievable with this formation. Having options will be key to scoring battle tactics.
Turns 4 and 5 will ideally be faced with little resistance if we have committed our exploitation forces correctly. If such an opportunity did not arise because the enemy stayed in the their corner, focus on scoring battle tactics and taking their army apart piecemeal. Eventually the points could even swing back and you can remove their OBJs and force their hand.
Conclusion
This plan sought to create a flexible, methodical approach that is appropriate to this battleplan in juxtaposition with an army that is more known for good ole' smashin' and bashin'. Sometimes ya needs to be more kunnin' than brutal. When you're making plans like this, remember that it can be all in your head and very much simplified. These diagrams and explanations are intended to help you visualize where in time (the turn and round sequence) and space (where on the board) you move your units as an army instead of simply pushing them forward.
Having some sort of plan or concept of how you will maneuver, what battle tactics you will be able to score, and how you will adapt to the battlefield as the situation develops will make you a better commander. Putting in some preparation beforehand will be like training and will allow you to default to what you have already practiced or considered in your analysis. I hope you've enjoyed today's read. Drop a line to let me know which faction and/or battlemap you'd like to hear about next. And of course, stay sparkly.