Subscribe to Sparkle Strategy

Tuesday, November 19, 2024

After Action Reports (AARs)

Introduction

As in life, we can learn just as much, if not more, from our losses in Warhammer. This idea is no new wisdom and the Army has conducted After Action Reports (AARs) for a long time. The fog of war very easily clouds our judgment and even our perception of reality. While tabletop gaming is nowhere near this grave, it is common to overlook valuable insights because we are not as intentional about reflecting upon the game. Sometimes it was a negative experience, we are rushed to get to our next game, and sometimes we are just lazy. Today we'll be looking at some techniques to get more out of your games by conducting AARs.

Negative Experiences

I cannot tell you how many times I have just turned my brain off in a game because I've gone full-on pouty mode. Dice rolls, my opponent's list/attitude, the overwhelming need to take a dump, any of these are reasons we have all likely encountered that have jarred our focus. We have a couple of options to remedy this: mediating how we respond to activating events or building in checkpoints or mechanisms to bring you back to a more stable state of mind. 

The best players do not give up when they've seemingly lost. It is common to become discouraged when a critical unit is destroyed or you fail a key charge. Remember, you win the game by scoring points, not by killing enemy units and keeping yours alive. Even if you are tabled, you'll score points for objectives you still control. Look at the scoreboard, see what you can still achieve, and limit your opponent. Often when there are fewer units for your opponent to interact with, scoring secondary points is more difficult.

Introspection

Reflecting on what went wrong can be challenging in Warhammer. It is easy to fall into the mind trap of "oh if my dice rolls were just a little better," but the hard pill to swallow sometimes is that things went poorly because we made a poor decision. But don't get down on yourself, being able to pick out a specific event like a bad decision means you can influence your play in the future. This is why I discourage players from getting in the habit of playing with "takebacks." Own the decision and see how detrimental that outcome will be if you make that mistake. That will better inform your calculus in the future.

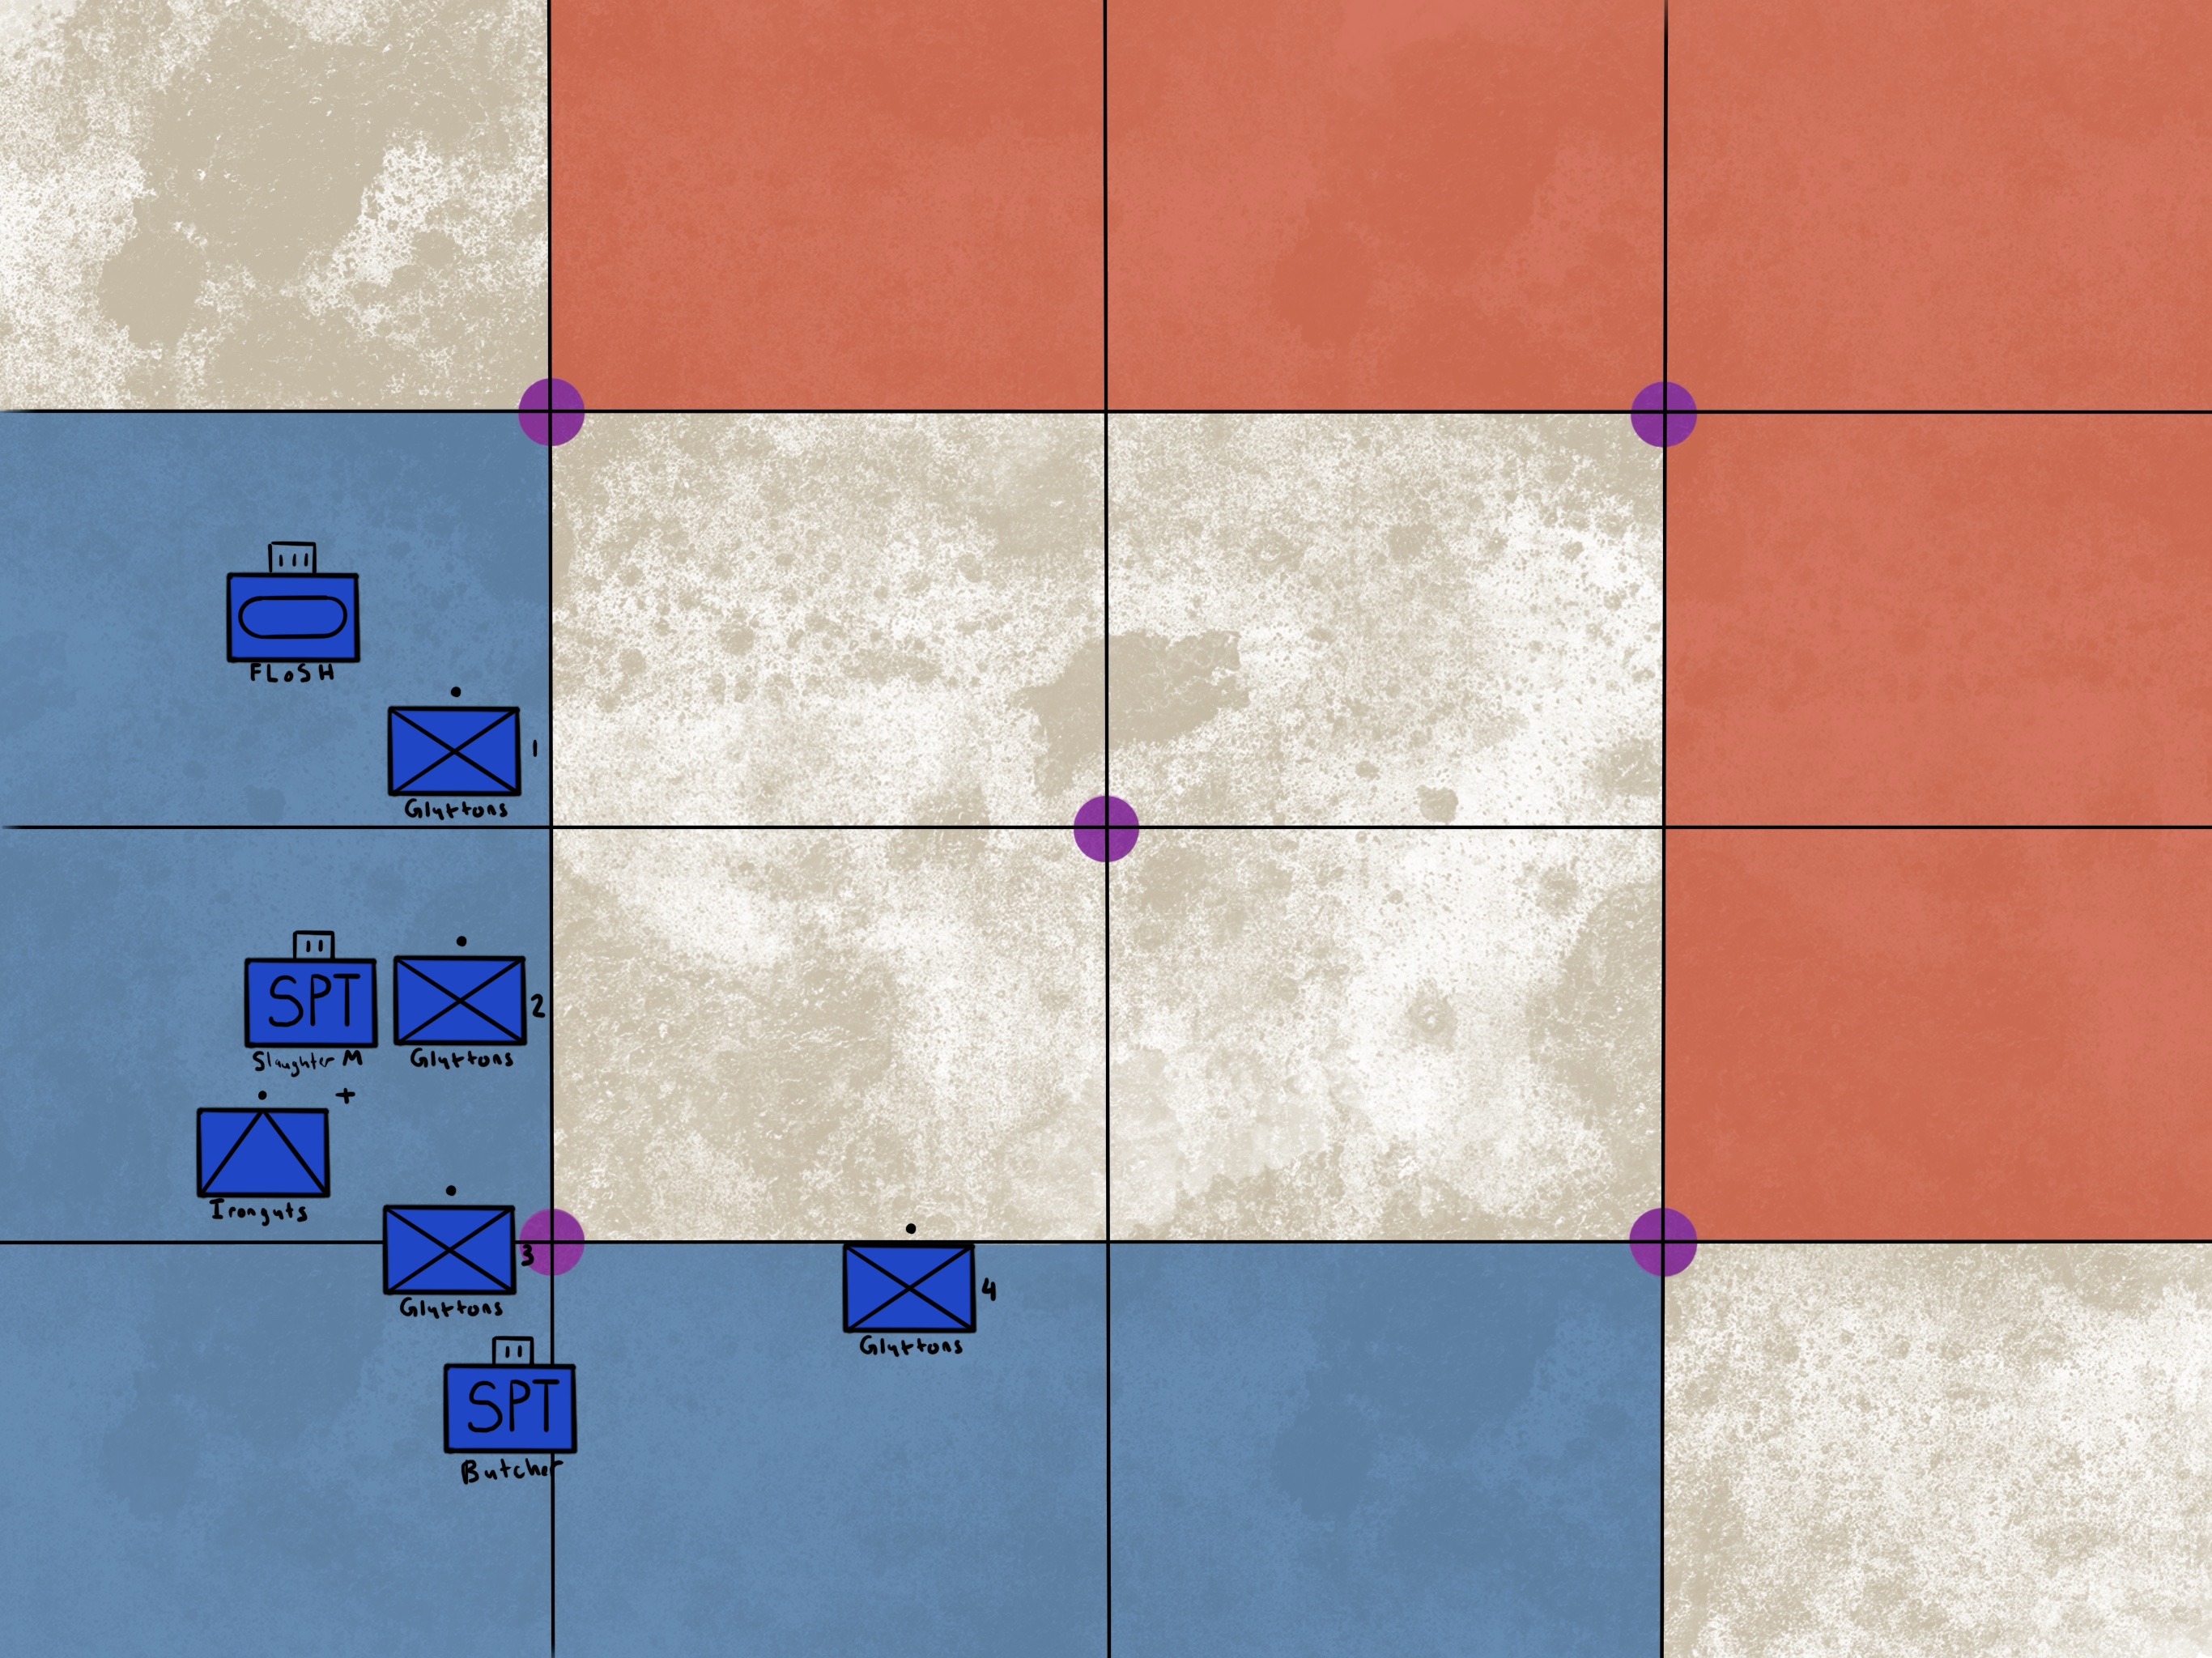
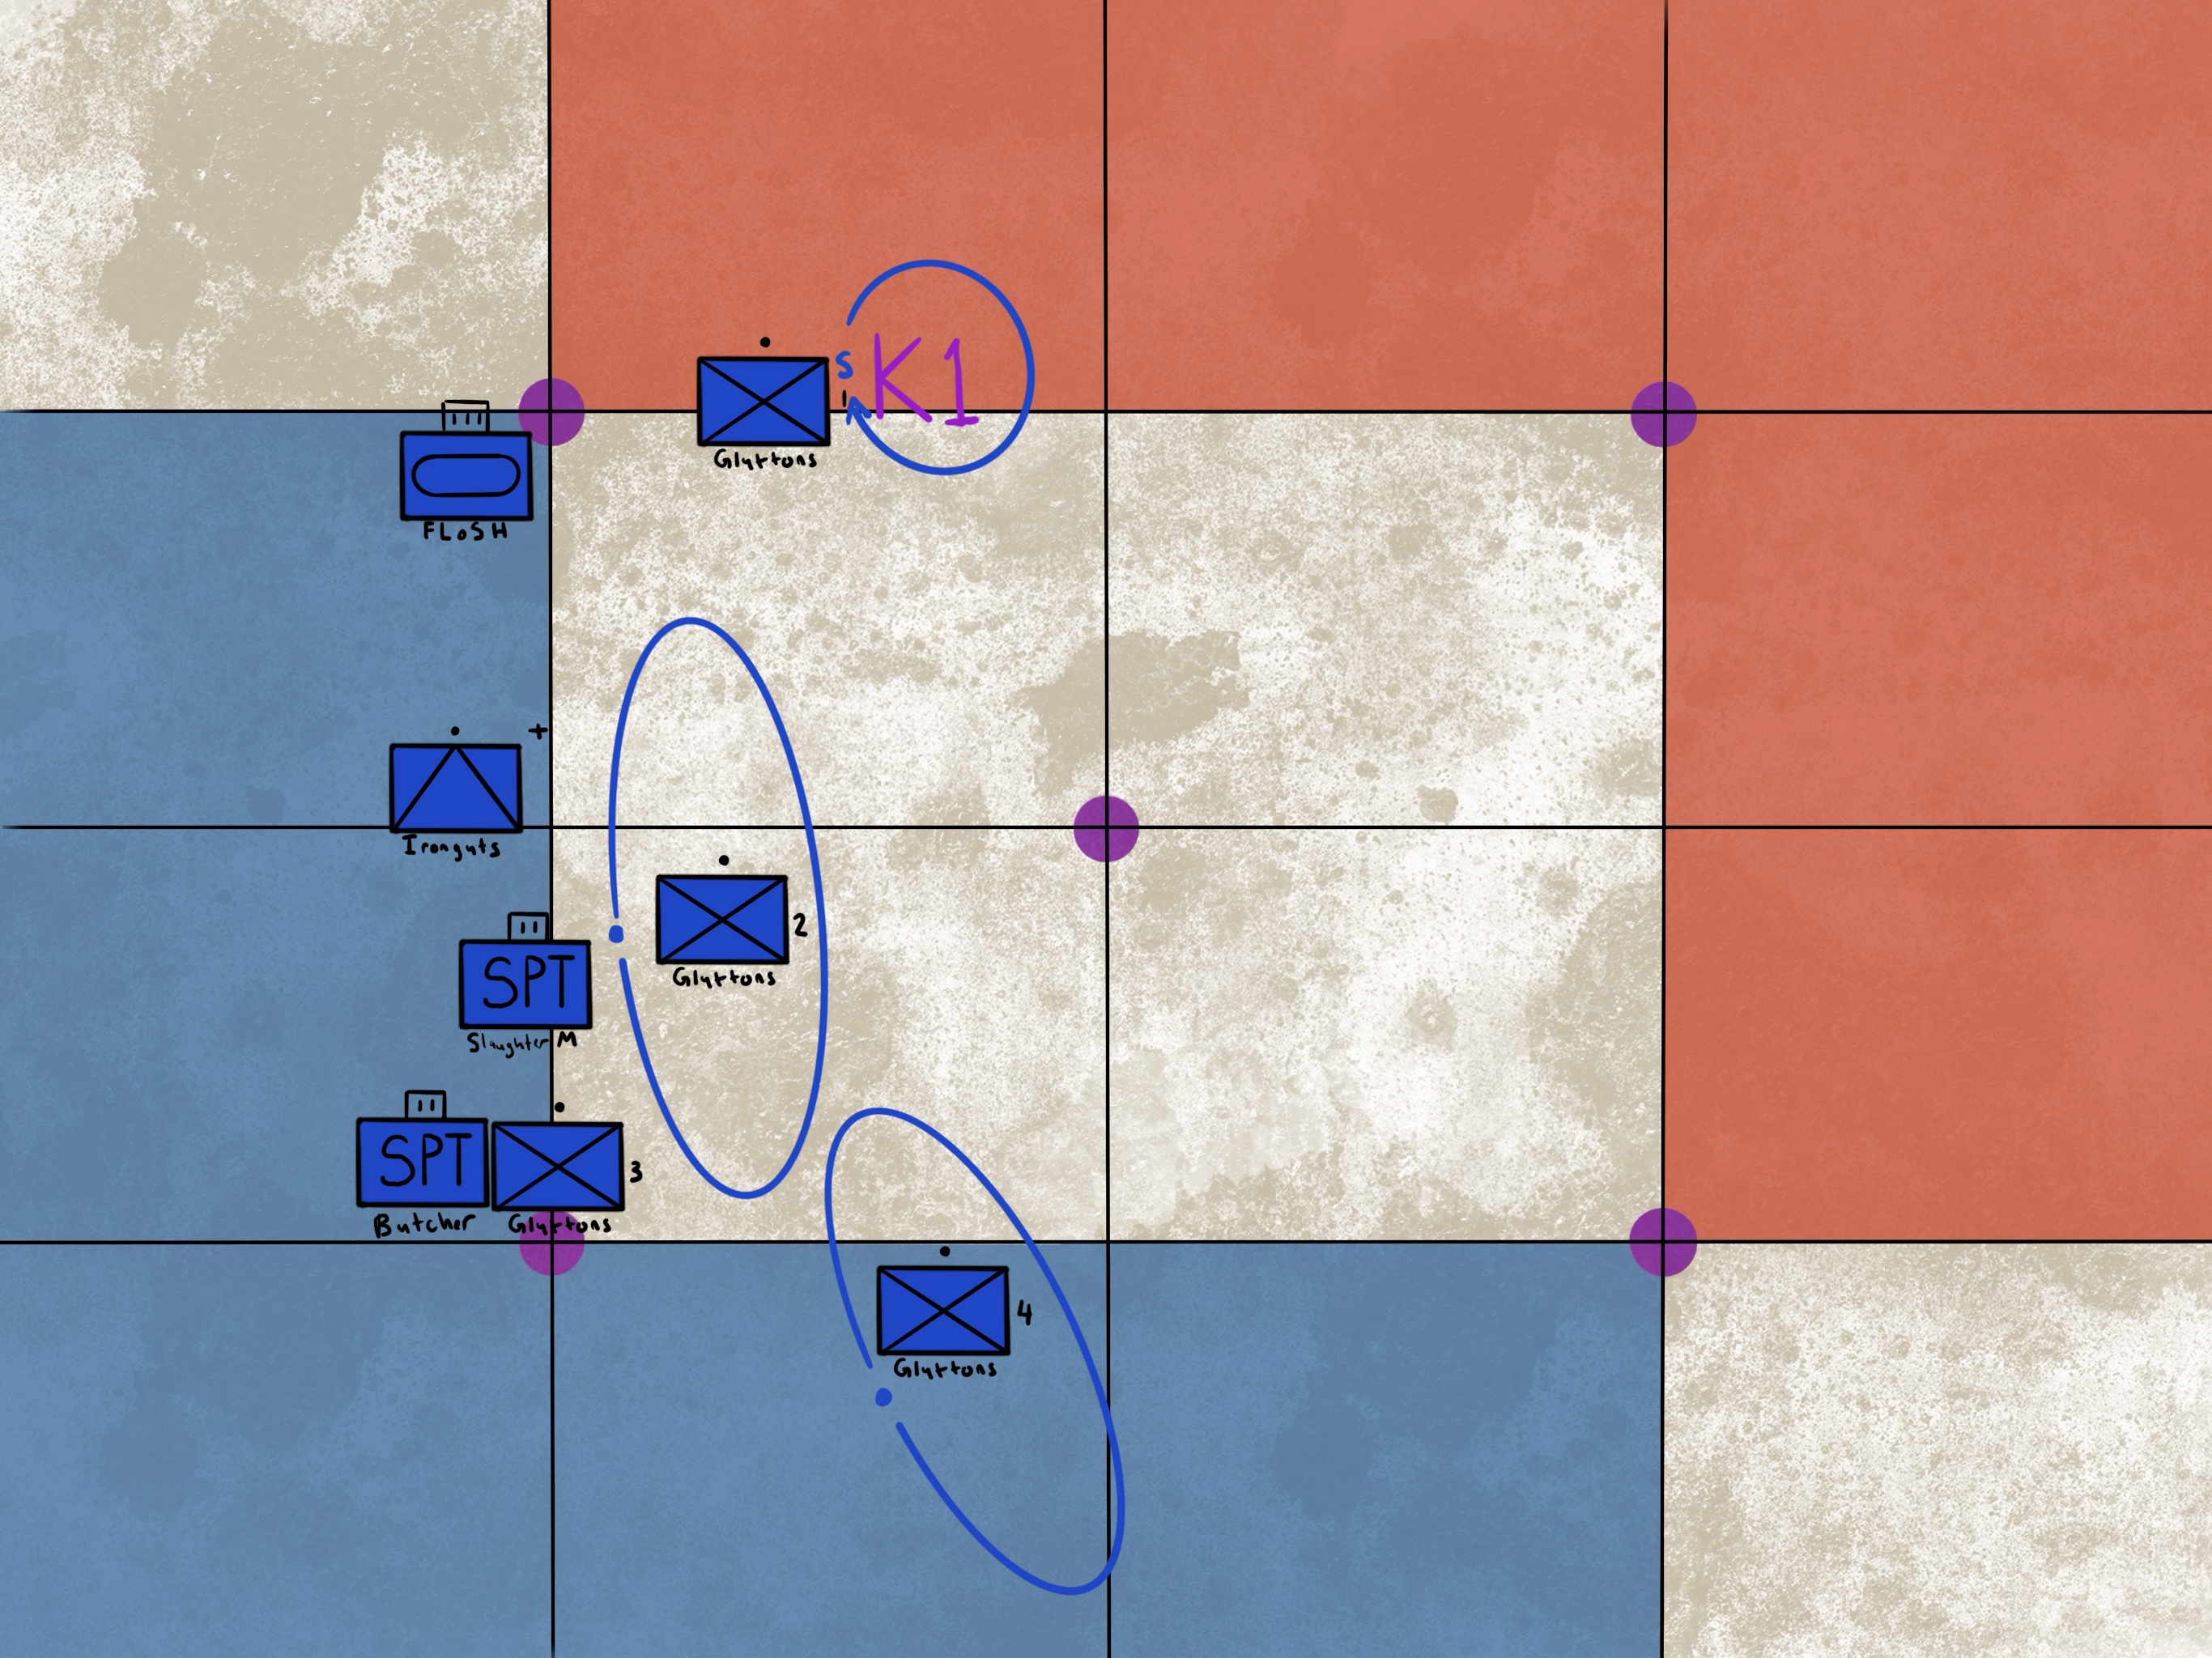
We can also become better at reflecting on our games with a couple of tools. Smartphones are pretty ubiquitous at this point, so I think I can confidently recommend two practices with that tool for your success: taking pictures and an app or other method to capture the decisions you made throughout the game. Snapping a photo at the beginning and/or end of each turn can help you understand how you and the enemy maneuvered in time and space. This will help you understand if you overextended your forces or failed to screen out an avenue of approach for your enemy. 

The other factor is something to help keep track of what decisions you have made. A few apps exist out there to help you keep track of scoring and battle tactics, but it would also be helpful to jot down what your logic was. Sometimes nothing beats a journal. This can also help you capture nuances of the obscene amount of rules that are out there. Much like in life, it can be hard to be present and involved. Journaling or capturing your thoughts in some other medium will help you reflect more proficiently.

Lastly for this subject, I encourage you to reflect with your opponent. What went well? What did not go so well? Were there any plays that surprised either of you? A new rule interaction you weren't familiar with? We can gather these insights and add them to our toolbox. I also enjoy this because it helps us celebrate some of the cool, pivotal moments and congratulate one another for them. 

Building Efficiencies

A common AAR comment in the Army addresses how prepared or unprepared Soldiers were for a task. One of the primary methods Soldiers use to be ready when the time comes is Precombat Checks (PCCs) and Precombat Inspections (PCIs). Basically, these are steps leaders take to physically ensure that Soldiers have everything they need from ammunition, water, and knowledge, to accomplish the mission. Wargamers can take a page out of the book for their kit as well.

Here are some easy wins you can implement to gain some efficiency and ensure you are preparing yourself to be successful:
  • Pack your army the same way each time. This helps you account for all of your units so you don't leave anything behind between games and also helps you deploy quickly and efficiently. When everything has a home, you won't need to waste time looking for it.
  • Have a wargaming kit. I have a backpack designated for wargaming and each pocket has its purpose. Make a list to run through so you have all the necessary tools for war as well as spares. "Two is one, one is none," goes the saying in the Army. 
  • Set your table up as consistently as you can. Have a designated spot for dice, tape measure, etc. It is also very helpful to stage out counted groups of dice, in sets of fives or tens for example, so you can quickly count and roll them. 
  • Know your warscrolls or have the physical copies readily accessible and organized. If you are taking physical warscrolls, store the unused ones, or even better do not bring them so you do not have to shuffle through to find the unit you need. 
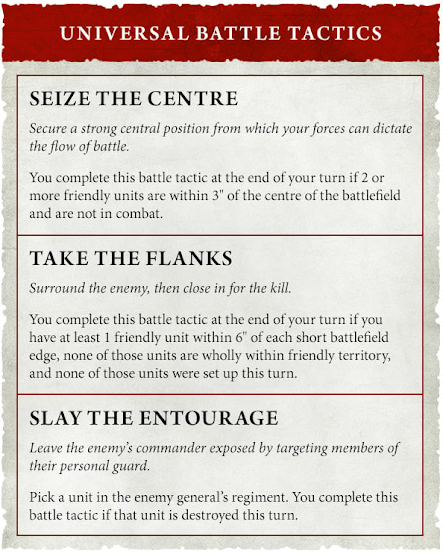
  • Have a reference sheet if you need help with the sequence of phases or other game rules. This helps you and your opponent be on the same page for battle tactics, scoring mechanics, and relevant rules. Many of us have gotten to our movement phase and forgot that we did not select a battle tactic. A tool to help you and your opponent isn't just good sportsmanship, it helps both of you understand how the gamestate is changing.
These may seem trivial but that ounce or preparation will be worth a pound of worry. Any efficiency you can build will reduce your mental fatigue in later rounds. You don't have the brain bytes to worry about these things, so make them habits.

STX Lanes

STX (Situation Training) Lanes are an Army training method to put Soldiers in common and challenging scenarios they might encounter in combat. Some scenarios are not designed to be "winnable," but are rather intended to develop the resolve and leadership in Soldiers in dire circumstances such as an ambush. We can do this in wargaming as well during our practice sessions. Set up the table for a bad matchup or a battleplan you aren't confident on. Set up those nightmare scenarios so that you can at least give yourself a chance to find out what strategies you can employ to maximize your opportunities. You can also set up STX Lanes to practice deployments based on matchups and battleplans. Having a strategy in mind that you can fall back on is another great way to minimize that mental fatigue and it also helps you feel more prepared and confident in your decisions.

Conclusion

Taking a more introspective look at how your games will often make you a better player than consigning fault to the fate of the dice. There are situations when the game is decided by a collection or even a single dice roll. If you put yourself in a position where that is the case, you should be very pleased with yourself. It was out of your control, you did the best you could. But there is almost always something you could have done better in a game. Using some of these techniques will help you feel more prepared and open to receiving those insights so you can avoid repeating those mistakes. 

Monday, November 18, 2024

Unit Roles

 Introduction

Even outside of wargaming, most folks would be able to understand that certain units or weapons platforms would have specific roles or purposes on the battlefield. One would not reasonably expect to destroy an enemy radar facility with a K-9 Military Police Unit, just as one would not expect an A-10 to maintain a security checkpoint. This concept is also pretty consistently important in Warhammer. Today we will discuss some of those unit roles and also discuss how they might change throughout the game.

Background

The following will be a general list of some of the basic archetypes in Warhammer: Age of Sigmar. We'll define each role and give some examples as well as how you would traditionally use them in a scenario. Those archetypes are chaff, hammers, anvils, support, and prospectors. Some units can have multiple roles but typically won't excel in each of those as much as a dedicated unit. 

Chaff

Don't let the name mislead you, this is arguably the most important unit role in the game. The tactical task of a chaff unit is to disrupt, delay, turn, or block the enemy to shape your offensive operations. Chaff are typically cheap, "disposable" units that exist to make the enemy's job of destroying key pieces of your army that they see as high-priority targets. Each army will have a different approach to this. Some chaff, such as Dryads, accomplish this simply by delaying an enemy by giving them wounds to chew through. Others, such a Gossamid Archers, disrupt the enemy's momentum but not become decisively engaged. Sometimes chaff is just a speedbump for your opponent. But if you waste even one of the enemy's combat activations, you're reducing that unit's output by as much as 20% throughout the game (if they can deliver that effect for all five turns). 

Hammers

On the flip side, hammers are the units you want to deliver to degrade, neutralize, or destroy the enemy's forces. Again, each army will accomplish this task with differing techniques. A common paradigm is a high quantity of lower-quality attacks vs. a low quantity of higher-quality attacks. each has its own benefits and drawbacks. Your job as a general is pairing the right damage-dealing hammer to the right target to maximize your opportunities to remove key pieces from the game that give your opponent options. Having multiple capabilities/types of hammers is often prudent as well. Generally, the types of lists that are most well-suited for success have flexibility in the types of damage they can inflict. Pairing into Nighthaunt is a great example: fewer, high-quality, high-damage attacks are more susceptible to variance because Nighthaunt ignores positive and negative save modifiers. No matter the rend, they'll have a 50% chance to negate each of those attacks, which is impactful when each of those attacks inflicts large quantities of damage. However, Large quantities of attacks, no matter the rend, are spreading that variability across many attacks. 

Anvils

Anvils are similar to chaff in that their role is to deny the enemy access to your key assets or terrain. However, they differ in that they look to remain in a positive to retain key terrain rather than displacing or providing only temporary use. Anvils are also useful for securing objectives and denying the enemy from scoring primary objective points. Again, this role is accomplished with multiple avenues. Some anvils are wound sinks that can recur models as casualties mount. Others have high armor saves or ward saves, thereby increasing their effective health. Primary objective points make up the greatest quantity of points you can score each round (60% of all points you can score in a game). Anvils are a way to lock down a portion of the board with less risk of losing your ability to continue to score these vital points. Maggotkin of Nurgle accomplishes this with several units that have a large wound base and a ward save to give their opponent a lot of wounds to chew through before they can gain control of an objective.

Support

Much like Medical Service, Logistics, and Military Intelligence, support roles enable maneuver forces (the military units that engage directly in combat with the enemy) to do their job. "Without supply, bullets don't fly," is the old saying. Warhammer also has these support roles, often in leaders or other "power pairs" that provide synergies or unlock abilities to make a unit more effective. Most often in Warhammer, we see this with Hero units that issue buffs through abilities such as magic or prayers. Some units support one another, such as Kroxigor and Skink units in Seraphon. This unit role improves the performance of another unit.

Prospectors

A newer term that I've heard in the wargaming community is the "Prospector." These units serve more specific roles to accomplish secondary objectives (Battle Tactics in Age of Sigmar). The closest parallel here may be Special Forces that bring a capability to insert into remote, austere locations to accomplish specific goals. Units with superior movement or the ability to be set up on the battlefield are great for getting to those specific locations to accomplish tactics such as Take Their Land or Take the Flanks. The best Prospector units can accomplish these tasks and continue to evade the enemy or be such a low-priority target that the enemy will not pursue them. Frost Sabres are a common Prospector unit taken in Ogor Mawtribes because they are not visible to the enemy unless they can get to within 9" of the unit. This can force the enemy to take valuable ranged or melee assets away from your key assets while you use them to farm secondary points. 

Changing Roles

While it is important to understand these roles in list-building and at a conceptual level, it is just as important to understand that they are not static. A good general will constantly evaluate the board state and be ready to adapt and reconstitute their forces for the task at hand. A great example is that something you might consider to be a key support role can become chaff as the game progresses. It can seem entirely contradictory to send the piece you've worked so hard all game to protect into the fray, but some situations call for it. Based on their relative board position, enemy disposition, and the path to victory, a squishy wizard hero may be all you need to move block an enemy from moving onto a key objective or scoring a battle tactic. Is there a spell that you need to cast? Is there a target for that spell to even go onto? These are the factors that can transform a unit's role throughout the game. 

Jaws of Gallet Analysis

Introduction

Another day, another installment. Today we will be analyzing the Jaws of Gallet battleplan through the lens of an Ogor Mawtribes army. Again we'll make a Course of Action (COA) sketch as a possible gameplan to execute depending on the composition and disposition of the enemy. This Ogor list focuses almost exclusively of Gutbuster Infantry supported by two foot-casters that also deliver excellent abilities. Complementing this force is a Frostlord on Stonehorn (FLoSH) that will be playing the role of the exploitation force, quickly delivering a great deal of combat power and an additional threat of rapid movement with the Stonehorn's rampage. 

The core concept here most closely resembles a movement to contact that transitions into an envelopment. This approach plays well into the more straightforward nature of the army. What happens, though, when the battleplan's twist can make your strategy play directly into your opponent's favor? Let's take a look at the Jaws of Gallet battleplan with the new information we have in order to create dilemmas for our opponent while we develop decision points, key events in time and space on the battlefield, so we can maintain the iniatiative.

Background


The Jaws of Gallet is a five objective battleplan. The twist is that from the second battle round at the end of their turn, the underdog can remove one objective (OBJ) from play. If there is no underdog, no OBJ is removed. You score 2 for holding an OBJ, 2 for controlling 2 OBJs, 2 if you control more OBJs than your opponent, and 4 if you achieve your chosen BT. A couple of takeaways here: Whoever goes first in the battleround starting with the second AND is also the underdog has the opportunity to score an OBJ then delete it. They also have the opportunity to remove an OBJ that you control before you can score it. The latter is the more common technique, where players might intentionally go down on points in order to shape the battlefield how they want it. This is especially effective with highly defensive armies. 

This COA sketch attempts to account for this by allowing to both react to how your opponent scores so you can remove the OBJs you want, or to be in a position to continue to apply pressure with your forces if they are the underdog and pull OBJs out from under you. Also remember there is a change in how you check for control of OBJs in this edition. You check at the start of the first battle round and at the end of each turn. Don't reveal any information you don't need to. If you deploy on two OBJs, your opponent immediately has a path to become the underdog on points and begin setting conditions in their favor. If you do not who will go first turn, avoid this mistake. 

I am inclined to believe that if it is apparent my opponent is going to intentionally go down on points, I will do everything I can to make them regret that decision. Because I do not know which OBJ they will remove, I need to maneuver in such a way that I can score battle tactics while maintaining security and bringing combat power to bear. We can also potentially throw a spanner in our opponents plans by flipping the script in putting them in a position where it may be disadvantageous to remain down on points. One technique we can use in that scenario is to only capture two OBJs or even intentionally drop a battle tactic. This is what makes the battleplan interesting and I would love to hear your thoughts.

Deployment 


The majority of our forces consist of Gluttons. This is because they are cost-effective and can perform independently relatively well. We have also chosen to run minimum strength units in order to get as many chances at damaging the opponent's units with the Trampling Charge ability. Additionally, this gives us added flexibility to achieve battle tactics. We deploy off of the "home" OBJ because we do not want to give our opponent any information that allows them to remove objectives. It also gives us the opportunity to select exactly how many objectives we want to score should our opponent deploy on an objective or if they go first in the first battle round.

We have arrayed our forces to sufficiently screen and maintain security with three units, Gluttons 1, 2, and 4. The FLoSH, reinforced Ironguts, and Gluttons 3 will serve as the exploitation forces after the initial point the enemy makes contact with our first line of troops. Examining the geometry of the map in conjunction with our capabilities, we want to keep our foot heroes (Butcher and Slaughtermaster) close enough to our combat power to use their abilities. Overlapping multiple units at one time to keep options open as the enemy produces casualties and attempts to outmaneuver us is essential. 

What we are setting up here is a situation where we create a dilemma for the opponent. We will advance along the long axis of the board, capturing primary OBJs and completing battle tactics to create a deficit. If the enemy attempts to remove OBJs and commit to the defense, we have multiple, diversified threats to commit to the counterattack.

Turn 1


Our first phase of this approach is establishing security as well as assembly areas for our exploitation forces. We know that our opponent cannot remove an objective this turn so we can safely bank on scoring the two western points (if they want to commit any forces that far from the rest of their army, We are only going to commit to these two OBJs no matter who goes first. It creates the dilemma for our opponent whether they want to go up on points or to be the underdog to shape the battlefield. We are arrayed in such a way that we can adjust for either. 

Gluttons 1 also has the tactical task of securing Key Terrain 1 in the north as a possible early battle tactic, Take Their Lands (based on the suggested terrain layout provided in the battlepack). Again, put this into context of how many points your opponent has scored if they went first. We want to remain far enough away from our opponent's maximum effective range (movement and charge) to disincentive them from committing a force that is not favorable for us to deal with. This means our forward line of troops could be closer to our territory or further away depending on the enemy's mobility. Even if they do commit to long charges, the likelihood of them successfully executing multiple (around 9"+) charges is slim. If they commit only a unit or two at a time, we have effectively disrupted their tempo. This advance also allows the Gluttons to be mutually supportive. If one unit gets charged, others on the flanks or from the rear echelon are in a position to attempt a countercharge (so long as you left space for them). 

Turn 2


At this point in the engagement, if the opponent is the underdog, they have the choice to remove a battle tactic. In order to do so without us having the opportunity to score it, this means that they have to go first in the battle round. This is why we have set up in a more cagey, deliberate fashion. They can take the first turn in the round as the underdog and remove the tactic, but our standoff distance and security posture we took makes such a decision costly. If we go first in the battle round, we have the opportunity to establish a hasty defense on the center objective and commit our first echelon of troops to the fight or to continue to deny the enemy freedom of maneuver across the board. 

More importantly, we are setting up for our decisive operation, the commitment of our exploitation forces. The Gluttons independently are a threat to the enemy and if we have destroyed any units, our Slaughtermaster can be handing out valuable offensive and defensive buffs. This is the point we are expecting the most likely contact with the enemy. Depending on the positioning of our Mawpot, we are also able to use the once-per-game heal to any units that have taken casualties. If the enemy commits a high value target or you see a gap in your opponent's defenses, your Butcher is now in a position to grant a run and charge ability to your Ironguts and in subsequent turns, have the option to head northwest to accomplish the Take the Flanks battle tactic should the need arise. We are also in a position that we are likely able to make charges and commit the entirety of our force should we choose to do so. 

This is the operation's decision point. How and when we decide to commit our exploitation force will make or break us. Ogors are not a very resilient army compared to some of its peers. It has a high quantity of health but low save characteristics. Some Ogor units can survive a turn or two into some enemies, but most hammers will not have much of an issue destroying a unit of Gluttons. Knowing this, we have to pick a single, decisive point to apply as much of our combat power as we can in an engagement. Massing effects with our mortal wounds output, relatively high damage output, and abilities to produce as many casualties as possible and defeat the enemy. 

Turn 3+


Here is where our offensive will likely begin to culminate as we conduct a single envelopment with our remaining forces and begin to secure the rest of the battlefield. Depending on how the enemy has engaged our forces, we can expect at least 30-50% of our forces to be destroyed. In this phase, we reconsolidate our gains by remaining close enough to any remaining objectives so we can capture whatever the opponent has not removed. 

By this time we will have committed the exploitation forces and ideally will have destroyed the enemy's capability and will to continue the fight. Because the margin of victory might be quite narrow even if we destroy the majority of the opponent's forces, we need to ensure we are able to continue scoring battle tactics. Here we can see that the Seize the Center, the Kunnin' Approach, or perhaps even Slay the Entourage could be achievable with this formation. Having options will be key to scoring battle tactics. 

Turns 4 and 5 will ideally be faced with little resistance if we have committed our exploitation forces correctly. If such an opportunity did not arise because the enemy stayed in the their corner, focus on scoring battle tactics and taking their army apart piecemeal. Eventually the points could even swing back and you can remove their OBJs and force their hand.

Conclusion

This plan sought to create a flexible, methodical approach that is appropriate to this battleplan in juxtaposition with an army that is more known for good ole' smashin' and bashin'. Sometimes ya needs to be more kunnin' than brutal. When you're making plans like this, remember that it can be all in your head and very much simplified. These diagrams and explanations are intended to help you visualize where in time (the turn and round sequence) and space (where on the board) you move your units as an army instead of simply pushing them forward. 

Having some sort of plan or concept of how you will maneuver, what battle tactics you will be able to score, and how you will adapt to the battlefield as the situation develops will make you a better commander. Putting in some preparation beforehand will be like training and will allow you to default to what you have already practiced or considered in your analysis. I hope you've enjoyed today's read. Drop a line to let me know which faction and/or battlemap you'd like to hear about next. And of course, stay sparkly.


Monday, July 15, 2024

Shifting Objectives Analysis

 Introduction

Let's apply some of the analytic techniques we've examined thus far to one of the new battleplans for AoS 4.0! Here's the situation: we'll create a scheme of maneuver and plan for a possible opening turn that allows us to maintain tactical flexibility without overexposing ourselves with a Sylvaneth list I'm using for an example. If there's any interest, I can create some downloads for the images/assets I'm using so you can create your own templates and plans. Let's dive into it.

Background

We are going to take a look first at the operational environment: The "Shifting Objectives" battleplan from AoS 4.0. This plan first appeared in 2020 and features a simple twist: At the start of each battle round after determining the active player, the active player will roll a D3 to determine which objective (OBJ) will be the primary. The primary OBJ scores you two points while secondary OBJs (the other two) net you one point and controlling more objectives than your opponent gains you another 2 points. Additionally the Underdog (player with the fewest victory points) can force the active player to reroll the dice when determining the primary OBJ. Successful battle tactics are each worth four points. 


Because the maximum points a person can score in a game is now limited to 50, this means the perfect turn would be complete a battle tactic (4) and control all of the OBJs (2 for primary, 1 each for the two other secondaries, and 2 for controlling more than your opponent). Scoring 10 points in a turn is quite likely to spread you quite thin and leave you vulnerable to attack. With only three OBJs to control, this rather thin and elite list will focus on delaying the enemy from seizing key terrain while you occupy two objectives.

The rationale here is that spreading across all three OBJs with this list would not allow for it to remain durable. Further, it is leaning into probability, that the primary OBJ will end up being an OBJ we control 66% of the time. In the event that it isn't, we will focus on holding the two secondary OBJs and therefore more than our opponent. 

Deployment


Remembering that deployment is our first movement phase, let's consider how to initially array our forces. Because we won't know who will be taking the first turn and as a means of concealing our intentions, our forces will generally be arrayed in a symmetric and centered fashion. Some notes to consider from initial impressions of the released battlepacks: units with the ability to shoot guarded heroes can be very powerful. Using obscuring terrain or in this case a well-placed Awakened Wyldwoods can make or break us. Another trend is the ubiquity of endless spells now that they do not have a points cost. To combat this, we will be putting out Warsong Revenant (who has a bonus to unbinding and banishing rolls) in a position that they can influence the battlefield and be within unbind range of the enemy casters. 

Next, we need to consider our options for Battle Tactics. This formation allows us to readily achieve two universal ones: Seize the Center (potentially quite powerful if we are able to cast the Lady of Vines' warscroll spell granting a 5+ ward) or Take the Flanks. Belthanos is positioned in such a way that he can quickly fly into position and still maneuver back to influence OBJ 1 in subsequent turns. If we deploy him too far from the short edge of the battlefield, we'll set ourselves up for a situation that this is not possible. 

Turn 1


An endstate we can seek to achieve by the end of Turn 1 might look something like this. In this scenario we have achieved the Take the Flanks battle tactic without sacrificing combat power or the ability for follow-on operations. In the event that we are the first to take a turn, we are setting up for the Dryads to occupy the key terrain between OBJs 1 and 2. The Gossamids use their shoot and movement tricks to Disrupt the enemy as they maneuver toward the area we are seeing to influence. If the enemy is going second, the Gossamids can disrupt them even further with the Countershoot and Redeploy commands. The Lady of Vines serves the purpose of providing the 5+ ward roll if her spell is successful as well as conferring the associated allegiance abilities she grants by proximity. Our Tree Revenants have teleported far from danger outside of our territory to gain our battle tactic and serves as a tactical reserve to snag objectives or terrain later in the game. 

Our Kurnoth Hunters with bows are supporting by fire in order to destroy key enemy heroes with their special rule or destroying/degrading other high value targets with harassing fire. The Warsong Revenant and Lady of Vines have an additional supporting operation by generating additional Awakened Wyldwoods to proc healing and provide maneuver options. Finally we have the decisive operation, Belthanos and the Kurnoth Hunters with swords attack by fire any enemy units that move onto OBJ 1 or OBJ 2. Depending on how the enemy concentrates their forces, we are positioned in such a way that both of these units can run and charge in order to complete their tactical task in subsequent turns. 

Turn 2


Based on our previous turn, the enemy will likely be maneuvering to seize their own key terrain. We have given them the option to attempt the Seize the Center or even Attack on Two Fronts. We can attempt to deny these battle tactics with redeploys and correct positioning with the Gossamids. It will all depend on the enemy's capabilities, though. We want to be in a position where we can expose the smallest echelon of our army to the enemy at any given time, minimizing their ability to charge into position and seize the terrain. And if they do, we want to be in a position to counter charge and make them pay for it. All while reducing their control scores by 3 when we are in combat because of the Battle Formation we chose, The Terror in the Eaves.

We are similarly poised to complete either of these battle tactics if the shoe is on the other foot. We have our most damaging units in position to destroy any units that are within charge or counter charge range. If our opponent plays more cagey and makes our charges difficult, we can also elect to use our tree revenants to complete the Take Their Lands battle tactic by teleporting close to terrain in territory that the enemy has ceded to us. 

Turn 3+

Here is where things get pretty murky and likely have too many moving parts to reliably predict what will happen. The point is this though: If our plan looks anything like this, we have set ourselves up to a point that we will have likely defeated the enemy; if they do not commit their forces to seize the key terrain in the center, we will have effectively scored battle tactics and primary points to create a sufficient point deficit. If they do attempt to seize the center, we can rapidly bring our most damaging units to bear and inflict as many casualties as possible. 

The truth is that if the enemy is going to survive the Kurnoth Hunters with swords and Belthanos attacking them, it is likely a matchup we would not have won either way. This plan at least puts us in a position to continue to score battle tactics and capture as many objectives as we can. Subsequent battle tactics would likely include Seize the Center (if we have not done this already), Reclaim the Realms, and Attack on Two Fronts. 

Conclusion

Speaking more broadly and without supporting diagrams, the scheme of maneuver for these last turns would be follow and assume or support (situation depending) in order to seize key terrain and continue scoring primary points. We are essentially taking this faction's most damaging units and using some of the army's best strengths to achieve the desired effects. Some armies have a myriad of tools at their disposal and will be strictly better at the game than others. Those who are seeking primarily to win the game should seek out those armies and apply these principles in order to reach their goals. A perhaps greater majority of players, however, have a sub-optimal army that they play for one reason or another.

This analysis today sought to show you how to apply the principles we've discussed to any army in the game to give yourself the best chance to win. Or at the very least, the best chance to have fun! I'll be looking to write and illustrate additional battleplans and army analyses in subsequent articles. Let me know what you think and stay sparkly, my friends. 


Thursday, June 20, 2024

War(hammer) a Human (or Aelf, Duardin, Orruk) Endeavor


Introduction

As a brief departure from the normal strategic analysis of wargaming, I'd like to review another very important aspect of command and warfighting I learned in the military that I believe is applicable to Warhammer: the impact of attitude and ethos on one's ability to fight and win in combat. Thankfully the gravity of wargaming is much, much less dire than actual war, but that does not mean we cannot glean valuable insights from studying the psychology of war to better prepare ourselves when we run into adversity. I cannot count how many times I have seen an opponent or experienced firsthand the deflating sensation of defeat, only to realize that a path to victory was still there. This concept is called the "will to fight" in military doctrine and will be the focal point of our article today.

Background

We will refer to a couple of key documents in today's analysis. First is the Rand Corporation's Will to Fight: Returning to the Human Fundamentals of War. The thesis of this writing is that the will to fight is the single most important factor in war, defining the concept as "the disposition and decision to fight, to keep fighting, and to win," (Will to Fight, p.3). Written through the lens of the American military, enjoying a technological overmatch relative to the enemy is inconsequential if those who wield it are unwilling to continue fighting as "casualties mount and unexpected calamities arise." Then we will examine the philosophy of training to learn how we can develop better skills to account for the horrible calamities our enemies bring to bear in Warhammer. 

War is a Human Endeavor

War always has been (but perhaps not always will be with the advent of AI and robotics being integrated into warfare) a human endeavor. The US Army explains in ADP 3-0, "War is a human endeavor - a fundamentally human clash of wills often fought among populations. It is not a mechanical process that can be controlled precisely, or even mostly, by machines, statistics, or laws that cover operations in carefully controlled and predictable environments. Fundamentally, all war is about changing human behavior." This parallels to a much simpler extent the unpredictable and behavior-driven nature of wargaming. We can do all the theory-crafting and math-hammer we want, but at the end of the day the dice and your opponent's will also get a vote. The good news is so do you.

A very common response to unexpected or undesirable outcomes in this game is to lose the will to continue and find a way to win. The decision to not pursue victory is just that, a decision. You are in control of how you respond to a situation, do not discount yourself. You very well might be correct, there may be no way to come back but you are doing yourself and your opponent a disservice by losing the will to fight. This is the behavior we should strive to change, focusing on remaining adaptable and resilient amongst adversity. I'll be the first to admit it sounds like lip service and self-help nonsense, but there is certainly a historical precedence to numerically and technologically superior forces underestimating the enemy's will to fight and paying a high price (refer to Rand's table below).


The study proceeds to classify the "disposition to fight" into different levels of analysis ranging from the individual all the way up to society. What I'd like to draw a parallel to here is the individual and unit levels. As an individual, your will to fight is generally a combination of your motivations and your capabilities to do so. In other words, it's a combination of how bad you want victory and your skills you've developed to achieve those ends. Both of these are in your control. Further, in the unit level of analysis, we have more factors in your control. While there isn't really any influence on your unit's will to fight, there are mechanisms for control scores and enemy capabilities to affect the conceptual will to fight of your forces. You can also examine what capabilities your army has to counteract those potential threats to your control and cohesion of forces. 

A common technique US military forces have used during training to simulate calamity and condition warfighters to respond is to notionally "kill off" key decision makers or leaders, forcing more junior troops to make decisions and find a way to survive and win. We can do similar things in our practice games to condition ourselves to find a way when things look the most grim.

Train as you Fight

"Train as you fight" is a very common adage in the US Army. A classmate of mine shared an interesting insight on the philosophy he used to train his Soldiers: "I don't train my guys until they get it right, I train them until they can't get it wrong." We can adapt these concepts for our list-crafting and practice games as well. Do not just consider and plan for what it looks like when your list has everything go right. Plan for when everything goes wrong. What if you don't get that key spell or ability off? What if you don't have as many command points remaining due to unforeseen circumstances? What if that high-probability attack profile whiffs? The best players can find ways to mitigate the inevitable variance of a dice game and find ways to right the ship when things go wrong.

I've referenced exercises you can perform when you don't have enough time for a full game such as performing Intelligence Preparation of the Operational Environment (IPOE) or mock deployments with a buddy, and I'd like to add another. Try taking turns with a partner in a situation that they believe they have you in an unfavorable position. Now work to get out of it. Take multiple reps with different approaches, finding any wrinkle you can to at least mitigate your opponent's impact. As you do this, you'll become more comfortable with how this situation affects you as well as conditioning you to how impactful it truly is. Master Sergeant (MSG) Larry A. Millner Jr. wrote in the NCO Journal about this concept in an article entitled "Choosing Hardship Today for an Easier Tomorrow."

A very important aspect of this conditioning that MSG Millner writes about is that "the Army routinely conducts challenging and realistic training allowing Soldiers to challenge themselves and even fail in controlled environments," (Millner, 2023). It is perfectly fine to fail in this game, especially in practice. It gives you a tremendous experiential lesson of what to expect in the myriad of possible scenarios that can unfold. Put yourself in those situations of adversity, cultivate that positivity, and you'll find that you're able to rise above it more often.

Lists Change, Attitudes Don't

A final related point I'd like to discuss is your choice as a player to respond to changes in the game. With a recent significant set of changes in the Warhammer 40,000 Dataslate and the epoch of 4th Edition for Age of Sigmar, we as a community are going through some pretty adverse changes. It is during these times that the skill of resilience and the will to fight become all the more important. Try to view changes in points, stratagems, or even entire armies' identities is an inevitable part of the game. Try to develop a perspective that is more self-aware and realize that these changes are at least intended to address the quality of the game experience for everyone. It is a cooperative gaming experience even if it is competitive. It is not just about you and your army's strength at the end of the day. You can lament the changes or you can find a new way to adapt to the situation and find a way to win. The choice is yours.

Wednesday, June 19, 2024

Shaping the Battlefield Conditions


Introduction

From armies that attempt to conduct an alpha-strike to armies that win through clever maneuver, each general is shaping the battlefield. We'll separate this into some subtopics: factors we control before the game, during set-up/deployment, and as the game runs its course. The goal of this article is to give you a framework to develop some "battle-drills," a sort of general approach you can apply with your units to put the game back into your control when you opponent takes action. In this battle of wits its important to constantly try and improve your situation by setting favorable conditions on the battlefield. That being said, let's discuss what efforts we can make to do so.

Background

As we've discussed previously, there is so much you can do outside of a game or tournament to give yourself a massive advantage before you even arrive at the table. The articles leading up to this have focused largely on analyzing your opponents but today we will discuss the process of analyzing your own army to develop a plan. This process is called Mission Analysis in the Army and it is typically a very protracted and arduous process. We won't be doing that. Instead we'll develop an arbitrary amount of "battle drills" for our armies (I'll use Sylvaneth in this example) that gives us some strategic flexibility to shape the battlefield depending on who we have across the table. Then we will discuss what information we can glean from the General's Handbook reveals to further refine our pre-game plans.

Sylvaneth Battle Drills

Before we develop any plans, we need to first understand what our army's strengths and weaknesses are. In this case, Sylvaneth have supreme maneuverability through their battle traits and can deliver very precise damage to units that would typically be denied to other armies. This also lends to them being able to shape the battlefield through maneuver by quickly massing and dispersing forces in order to create gaps and vulnerabilities in the enemy formations. Finally as a strength, they can quickly capitalize on vital terrain by teleporting to deny/delay maneuver as well as score primary objective points when the enemy vacates parts of the battlefield.

As for weaknesses, Sylvaneth is unable to stay in protracted engagements with opponents due to being an elite army and fewer built-in defensive abilities. They have access to quality screens in the form of Dryads (per 3rd edition anyways), but as soon as they get tied up in combat or can be effectively screened out with board presence, they can struggle. As an army they are also susceptible to mortal wounds (we will see with 4.0 how they fare to mortal damage) with limited access to wards. Finally, anti-magic or magic supremacy armies can easily deny the Spiteswarm Hive endless spell, greatly diminishing their ability to reliably Strike and Fade. 

Sylvaneth Battle Drill 1: Howl's Moving Castle

Turn your Warsong Revenant into a gorgeous blonde wizard bubble-wrapped with a host of Dryads as you repeatedly pick apart your opponent with a Strike and Fade unit (think Durthu or Kurnoth Hunters) as you march up the board and keep the invaders out of your center of gravity. Factors to consider here is reliable access to Strike and Fade, selecting appropriate Overgrown terrain, and not giving the opponent the opportunity to tie down your hammer pieces. 

This battle drill will perform best against armies that are not able to interact with your ability to Strike and Fade. This is a slower-tempo army. It is a common misconception that it is used to alpha-strike the enemy but this opportunity rarely presents itself. Rather, the idea here is to weather the storm of your opponent crashing against the tree-bodied walls of your castle as you launch Durthu cruise missiles at their army until they have lost enough meaningful combat power and you can overwhelm them. 

That being said, armies with the ability to easily unbind or dispel Spiteswarm Hive make this task very difficult (or even in the season of Primal Dice, most armies). Additionally, armies with good recursion are able to weather the Strike and Fade and outlast the trees. 

Sylvaneth Battle Drill 2: Deny Flank

Sylvaneth is an army that cannot hope to attempt to branch out from its central identity. It is not a horde army so it cannot hope to be successful by spreading out its combat width. Rather, it must rely on force concentration to approach the enemy in a piecemeal fashion. That does not mean, however, you should telegraph your punches by lining your hammer up on a train track to where you intend to apply it. Sylvaneth's superior mobility allows you to keep you opponent guessing by being able to rapidly flip the table as if you had the ability to redeploy units. 

Consider a scenario: you deploy your forces as Sylvaneth spread as far out as possible in your deployment zone. The opponent can try to match your combat width or they can remain concentrated and not try to match you. This in turn puts the initiative back into your hands by granting you agency to respond. If they try to match your combat width, it allows you to use your teleport abilities to reconsolidate your forces to a weaker flank and defeat the enemy in detail. Alternatively, they can turtle up themselves which leaves you the ability to expand your board presence and rack up some primary objective points while the opponent foot slogs across the board.

Where this approach struggle is armies that can match or mitigate the tree's movement. Its important to consider things like summoning (which seems to be going away in 4.0), teleporting, or even redeploying as a part of your calculus in the enemy's movement capabilities. If your opponent can match your speed, you are unlikely able to match their local combat power when they arrive to you. A speedy army or armies with the ability to spread out their units over large footprints are also able to limit your options for maneuverability. 

Sylvaneth Battle Drill 3: For whom the Belthanos Tolls

Belthanos brought about a very interesting wrinkle to the Sylvaneth approach to the game. It allows models to run and charge with certain criteria, circumventing the shortcomings and limitations of Spiteswarm Hive by enabling you to cover great distances with a run and charge coupled with more maneuverable units (such as Alarielle or Durthu with the Warsinger Command Trait). 

This army finds success because it removes a major factor that inhibited the previous two builds: the ability to counter Spiteswarm Hive. When Belthanos allows you to run and charge while also creating more Overgrown Terrain throughout the game, you are not relying on casting a spell, having that spell unbound or later dispelled, or rolling the dreaded 1 on the Spiteswarm Hive dice. Additionally, it diversifies your threats by having Belthanos paired with one or two additional very high output models such as Alarielle and Durthu. 

Where this battle drill can struggle is the lack of available screens and board control. It is not uncommon for you to finish games with just a few models left on the battlefield when all is said and done. Your opponent will not have to work nearly as hard to eliminate your threats when you cannot afford to take screens because you invested so heavily on maneuverable, damaging hammers. 

Tying it together

With these battle drills in mind, we can craft a list and come to the table with an approach that we are comfortable with. Even with great units and theory behind it, without a practiced approach and a strong comfortability with the list we are likely to fail This is what makes this preparation phase so important. You could take a combination of approaches or change up which battle drill you use as the situation develops, but if you don't have a playbook to fall back on you will likely make it up as you go which exposes you to unnecessary risk. 

Shaping Operations During Setup and Deployment

Depending on the tournament rules, you will also have some interaction with shaping the battlefield before you deploy your forces. Player-placed terrain is not uncommon in some tournament formats and can allow you to set favorable conditions or at the very least give you options. If you have the opportunity to place terrain, make sure you understand if and how your opponent can interact with them. Can these be selected as points for returning models to the battlefield (i.e. Soulblight Gravelords previewed for 4th edition). Can you or your opponent create choke-points with the terrain that will allow you to deny or delay them? 

Then comes the matter of deployment. Your first movement phase isn't in the first battle round, it is in deployment. Set those conditions before you even start so you can actually execute your plan. In our Sylvaneth example, you cannot perform a deny flank maneuver and quickly flip the board if you don't meet the distance requirements to teleport around. Set yourself up for success and control every factor you can to give yourself an advantage. Practice these deployments across various maps, too. If you're short on time for a game, go through a few mock deployments with a buddy. Take a look at the Warhammer Community article on optional terrain maps to understand how you can use Obscuring and Impassible terrain to your advantage. 


Shaping Operations During the Game

This falls back into the discussion of proactive and reactive play. Keep your Battle Drills in you pocket as you form and adapt them to the existing conditions. Then, work backwards from the endstate you want to achieve. In terms of phasing your operations, it could look something like: "by the end of battle round 1, my two squads of Dryads have secured the key terrain spanning the impassible terrain in the enemy's territory and the western flank of the center objective in order to delay the enemy and allow the main body (your castle) to secure the center objective and score the 'Seize the Center' Battle Tactic." This will help you shape the subsequent turns for you to perform follow-on actions, whatever those may be.

For instance, you could anticipate that the enemy collapses on the center and makes their decisive operation be to take the center objective from you. If this is the case, you can develop the branches and sequels to the first battle round and develop a proactive solution to whatever course of action the enemy takes. There isn't one right answer besides this: make adaptable plans that constantly put the pressure on your opponent to have to make bad decisions. No two games will be alike and you will need to adjust your plan. Just do yourself the favor of having that framework to fall back on. 

Conclusion

I hope you'll consider this approach when you are theory crafting your next list and considering how to improve your play. Again I must stress that this isn't THE way to approach it, it is merely A way. Much like the reasoning for training and doctrine in the military, we can develop something to fall back on when the proverbial Stonehorn feces hit the fan. I hope you've enjoyed this read and if you have please share with a friend, subscribe, or drop us a line to let us know what you did or did not enjoy. Stay Sparkly my friends. 

Thursday, May 2, 2024

Phasing Operations

Introduction 

The ability to score battle tactics (or secondary objectives in Warhammer 40K) for factions varies considerably across the board. Some armies enjoy tremendous mobility or killing power or otherwise have a veritable toolbox to consistently achieve their battle tactics. While it is unclear what will happen to "book" battle tactics in AoS 4.0, we do know a fair amount of what is to come for universal battle tactics and grand alliance battle tactics. Today we will discuss how to develop a strategy to achieve these more methodically through the military concept of phasing to develop a scheme of maneuver. 

Some members of the Sparkle Motion team will be unveiling an exciting new forum to discuss strategy and several other wargaming topics on a new podcast, so stay tuned for that. In the meantime, let's don our tin foil hats to speculate about the new edition, and then conceal that tin foil hat under our Field Marshal's campaign hats so we can retain the initiative with the new edition. Follow us, share, or just talk with your gaming group about what you learned today about phasing and planning a scheme of maneuver.

Background

The US Army operates by issuing lawful and/or direct orders, that is probably not a surprise. But what you may not have heard of are Operation Orders, or OPORDs. These regimented documents are universal throughout all formations of the Army and give consistent guidance on the commander's vision to accomplish the mission. These OPORDs are also nested within echelons so that they are all working to a common goal and enabling one another for success. 

There are five paragraphs that appear in every OPORD, in the same order each time. They are situation, mission, execution, sustainment, and command and control. Each of these provide a detailed but concise format to disseminate information throughout an organization in a very rapid fashion. Today we will focus solely on paragraph three: execution. 

Execution

The third OPORD paragraph begins with the commander's intent, a simple statement that summarizes how the commander wants the battlefield to look when the dust settles. Our commander's intent will vary somewhat on our opponent's capabilities, but generally it will be oriented on scoring as many points as you can while denying points to your opponent. Your intent needs to adjust from matchup to matchup. For armies that are particularly durable, it is generally not worthwhile to destroy them. The only path to victory may instead to not become decisively engaged, retain key terrain to score primary objective points, and achieve battle tactics while you set conditions to make it impossible or at least difficult for your opponent to achieve theirs. Essential to all of this is deploying in a fashion that makes some of the battle tactics easier for you and understanding what is feasible and achievable as the situation develops.

Let's take a look at what we know for sure is coming in terms of battle tactics for 4th edition:


These are three of the promised six universal battle tactics to be released at launch in the upcoming General's Handbook. We see two tactics, Seize the Center and Take the Flanks are spatial in nature but also diametrically opposed. Some armies will have a predilection to one or the other, which is the sort of analysis you need to do when you're developing your commander's intent. Are you an Ossiarch Bonereapers general that has access to (at the time of writing) some of the highest durability and melee debuffing in the game? Spreading out to achieve the Take the Flanks battle tactic would likely not be conducive to your overarching intent of maintaining a tight formation and dominating a concentrated part of the board with your resources. Alternatively, a Tzeentch general may happily pursue both Seize the Centre and take the flanks almost simultaneously because of their ability to rap
idly summon durable (or rather, gibbering and splitting wound sinks) units. 

The point is that without some semblance of a plan, there is a good chance your approach to the game will be disjointed and you'll find that you deployed your forces in such a way that you'll be hard pressed to accomplish what you intend to. Having an idea in mind of which tactics you can aim for each turn as well as alternative branches your plan can take when the situation changes. This plan is called your Scheme of Movement and Maneuver.

Scheme of Movement and Maneuver

We'll refer to this as your scheme. Your scheme is how you plan to array then move your forces throughout the battlefield to achieve battle tactics, control the board, and defeat your opponent's forces. Sometimes defeating your opponent means destroying their units. Other times it is simply a matter of isolating or containing them. Whatever the case is, we take what we learned from our IPOE steps to understand how the environment will impact our operations as well as the enemy.

Let's create an example scenario. We will play as the Ogor Mawtribes army from our previous discussions and walk through how we analyze the battlefield and make a scheme that has tactical flexibility. In the early game, we do not want our forces to be arrayed with a wide breadth because that makes it more difficult to capitalize on our greatest strength: the ability to inflict large amounts of out-of-combat phase damage that gives our opponent even less agency in dictating the fight. We need to be in a position that we can reliably close with and engage with the enemy in melee. That being said, take the flanks in the early rounds is not advisable. Your units would be maybe 50 inches apart or so. That means they are not getting into the fight or are being taken away from valuable screening or attack by fire roles (e.g. your Gnoblars and Ironblaster, respectively).

You also lack information on what the enemy course of action (COA) will be. You have hopefully narrowed it down to a couple of COAs but you likely won't have perfect information. A good rule of thumb is to have one battle tactic in mind for the upcoming turn based on the current board state and at least one other alternative if your opponent takes a more unexpected route. This is why armies such as Kruelboyz (at time of writing) have had some recent success. Their battle tactics are very achievable, flexible, and leave little room for the opponent to interact with them. 

This leads into our next point. It is not enough to be pursuing your needs in the scheme of maneuver, you need to simultaneously be disrupting your opponent at every opportunity. It is easy to fall into the mindtrap of solely focusing on what your battle tactics (BTs) will be. Consider the raw points differential of denying battle tactics. If you can achieve a battle tactics while your opponent scores an additional point for primaries, you can start to make up some ground.

Round

Battle Tactic

Primary

You

Battle Tactic

Primary

Opponent

1

2

2

4

2

3

5

2

2

2

8

0

3

8

3

2

2

12

2

3

13

4

2

3

17

2

2

17

5

2

3

22

2

2

21

Grand Strat


25


24


In this example, even though your opponent controlled more objectives for 3 out of the 5 rounds, denying just one battle tactic of theirs made it possible for you to win by 1 point. This may not appear to be much at first glance, but let's consider the benefits of going down on primaries for part of the game. Spreading out and controlling fewer objectives allows you to concentrate and mass your forces more while your opponent has spread thin to gain at least one more objective than you. It also allows you to have a specific point in time that you know is your "go turn," where you need to aggressively engage with the enemy to turn the tide. This is our decisive operation, and in this instance it occurs at round 4. 

Conclusion

This is what we have been talking about, controlling the tempo, phasing your operations to achieve exactly what you need, no more. This sacrifice of points, trading that space on the battlefield, has given you more time and tactical flexibility to choose your engagements on your terms and ensure that you can set up for battle tactics without making yourself vulnerable. Many times before I have lost sight of the bigger picture in pursuing a battle tactic, not realizing that I did so at the expense of the game. Getting those two points is not worth getting yourself into a bad position. This is why giving away the double turn is so powerful. It keeps putting the onus onto your opponent to get out of position and spread themselves too thin. When you can be in a position that you are indifferent to the double turn and recognize when it is time to capitalize on it to deal a decisive blow, you'll realize that you're doing it right.

Thank you for joining team Sparkle Motion on this part of the journey today. Hopefully you'll leave after reading this article with a better understanding of how to phase your operations, select BTs that allow tactical flexibility, and how to control the tempo of the game. We'd love if you gave us a follow, shared this article with a friend, or gave us any feedback on how to get better information to you. Until next time, stay sparkly.

Limited Resources Battleplan Analysis

 Introduction Today we will be looking at the Limited Resources battleplan to develop some strategies and avoid unnecessary risks. It is an ...